Upgrade Your VMs Harware to a Specific Version
- Byron Zepeda
- Category: PowerCLI
- Read Time: 5 mins
In today's article, I'll be showing how to upgrade the VM hardware version using PowerCLI for either one VM or multiple VMs at a time to version 11, 12, 13, 14, 15, or any version. Additionally, I'll show you how to target a specific group of VMs by name or based on their location in a given cluster using a one-line command.
I recently wrote an article about How to Downgrade VMware Hardware Version due to incompatibility, but what about upgrading to a particular version? It's easy to upgrade VMs to the latest version within vCenter Server or even using PowerCLI. However, what if you needed to upgrade dozens or even hundreds of VMs to a specific version to maintain compatibility. Using the HTML5 client only allows you to upgrade to the latest version, but sometimes that's not what you'll want. While you can connect directly to an ESXi host client, then modify each VM there, you would need to login to multiple ESXi hosts, which would not be ideal if you have many VMs to change.
Make sure that your VMs are powered off before making any change, otherwise, you'll get errors.
Before making any changes, especially in a production environment, take a snapshot, a backup, or SAN snapshot. Also, do this on 1 VM if you're not yet comfortable in PowerShell.
If there is any doubt in your mind about what you are doing, you'll be better of creating a test VM that you can play around with instead of using a production VM.
If you need help installing and configuring PowerCLI, please see my article Install VMware PowerCLI.
Upgrade One VM
Get-VM VM13 | select Name,PowerState,Version
Which produces the following output:
Get-VM VM13 | select Name,PowerState,Version

Name PowerState Version
---- ---------- -------
VM13 PoweredOff     v13
In the example, you can see that the VM is at version 13 and we'll want to upgrade to version 14 by typing:
Get-VM VM13 | Set-VM -Version v14 -Confirm:$false
The command above gets a VM named "VM13", then sets the version to "v14" and suppresses the confirmation message by using "-Confirm:$false". If you're new to PowerShell, you can omit this to get the warning and play it safe each time you make the change.
If you are getting an error upgrading VMs to a specific version and it's failing, you'll need to make sure that you upgrade your version of PowerCLI to the very latest. At the time of this writing, upgrading to version 15 using PowerCLI was not working.
This is the error you'll encounter when trying to upgrade to v15:
get-vm VM21 | set-vm -Version v15
Set-VM : Cannot bind parameter 'Version'. Cannot convert value "v15" to type
"VMware.VimAutomation.ViCore.Types.V1.VM.VMVersion". Error: "Unable to match the identifier name v15 to a valid enumerator
name. Specify one of the following enumerator names and try again:
Unknown, v4, v7, v8, v9, v10, v11, v12, v13, v14"
At line:1 char:31
+ get-vm VM21 | set-vm -Version v15
+                               ~~~
    + CategoryInfo          : InvalidArgument: (:) [Set-VM], ParameterBindingException
    + FullyQualifiedErrorId : CannotConvertArgumentNoMessage,VMware.VimAutomation.ViCore.Cmdlets.Commands.SetVM
This also shows you all the valid version numbers that VMs can be upgraded to, which are:
- Unknown
- v4
- v7
- v8
- v9
- v10
- v11
- v12
- v13
- v14
See VMware https://kb.vmware.com/s/article/1003746 for a complete list of versions and their product compatibility.
Upgrade Multiple VMs
Next, let's look at targeting multiple VMs by their name using a wildcard or a specific list of VMs. We'll start by listing all the VMs in my lab.
Get-VM | select Name,PowerState,Version | sort Name

Name  PowerState Version
----  ---------- -------
DC     PoweredOn     v14
VCSA   PoweredOn     v10
VM11  PoweredOff     v14
VM13  PoweredOff     v14
VM14  PoweredOff     v14
VM15  PoweredOff     v14
VM20  PoweredOff     v11
VM21  PoweredOff     v11
WEB01 PoweredOff     v11
WEB02 PoweredOff     v11
Get-VM VM2*,WEB01,WEB02 | Set-VM -Version v14 -Confirm:$false

Name                 PowerState Num CPUs MemoryGB
----                 ---------- -------- --------
WEB01                PoweredOff 1        4.000
VM21                 PoweredOff 1        4.000
WEB02                PoweredOff 1        4.000
VM20                 PoweredOff 1        4.000
Upgrade Multiple VMs by Cluster
Get-Cluster LAB | Get-VM | select Name,PowerState,Version | sort Name
Get-Cluster LAB | Get-VM | Set-VM -Version v14 -Confirm:$false
Upgrade Multiple VMs using a PowerShell GUI
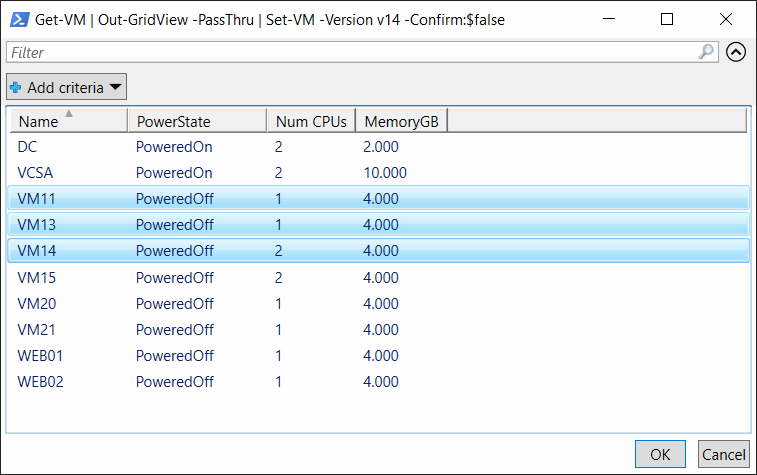
Get-VM | Out-GridView -PassThru | Set-VM -Version v14 -Confirm:$false
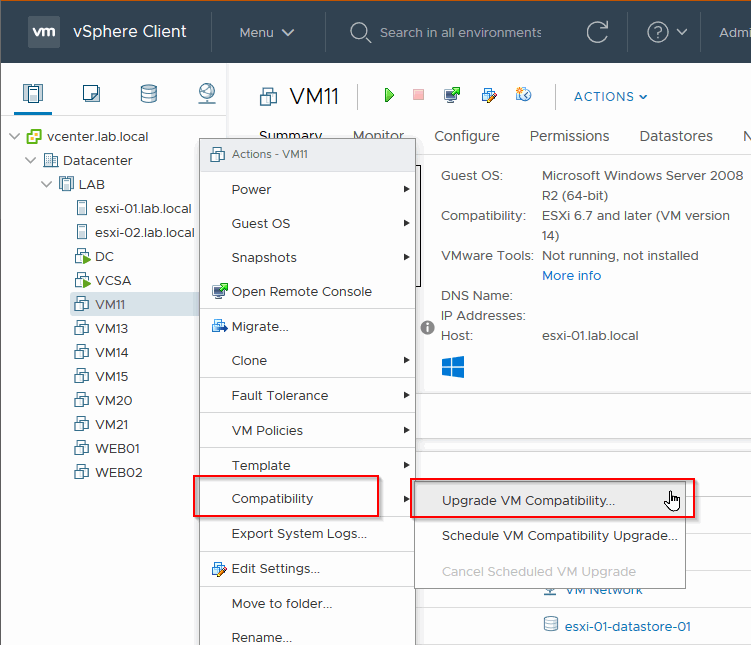
Upgrade Multiple VMs by Using The HTML5 Client
Popular Tags
Latest Articles
-
VMs get Powered OFF when expanding virtual Disk
-
Temporarily clear locks from your VMs and disks fast
-
Simple Guide on How to Fix a Printer That's Offline
-
SSHing to a Ubiquiti Switch: A Step-by-Step Guide
-
How to Uninstall MSI Using PowerShell and an RMM
-
Getting Started with VMware: Subscribing to VMUG & Getting Discounted Licensing for Your Home Lab
-
AI – A Risky Business: Unveiling the Dangers of AI
-
Key Distinctions between VMware vSphere ESXi and Microsoft Hyper-V
Categories
Certifications

